Regarding the architecture of Android programs, the most popular mode is MVP mode. Google officially provides Sample code to show the usage of this mode.
Repo address: android-architecture.
This article is a reading note and analysis for reading the official sample code.
Official Android Architecture Blueprints [beta]:
Android provides a lot of flexibility in how to organize and structure an app, but at the same time this freedom can make the app difficult to test, maintain, and extend.
Android Architecture Blueprints showcased possible solutions. In this project, we implemented the same application (To Do App) with a variety of different architectural concepts and tools. The main focus is on code structure, architecture, testing and maintenance.
But keep in mind that there are many ways to structure your app with these patterns, and don't use them as absolute models, depending on your needs.
MVP mode concept
There was an MVC pattern before: Model-View-Controller.
The MVC pattern has two main drawbacks: First, the View holds references to the Controller and the Model; second, it does not restrict the operation of the UI logic to a single class, which is shared by the Controller and the View or Model.
So the MVP model was later proposed to overcome these shortcomings.
MVP (Model-View-Presenter) mode:
Model: Data layer. Responsible for logical interaction with the network layer and the database layer.
View: UI layer. Display data and report user behavior to Presenter.
Presenter: Take data from the Model, apply it to the UI layer, manage the state of the UI, decide what to display, and respond to user behavior.
The main advantage of the MVP mode is that the coupling is reduced. The Presenter becomes pure Java code logic, and is no longer associated with classes in the Android Framework such as AcTIvity, Fragment, etc., which is convenient for writing unit tests.
Todo-mvp basic Model-View-Presenter architecture
There are four functions in the app:
Tasks
TaskDetail
AddEditTask
StaTIsTIcs
Each feature has:
A Contract interface that defines the View and Presenter interfaces;
An AcTIvity is used to manage the creation of fragments and presenters;
A Fragment that implements the View interface;
A presenter that implements the Presenter interface.
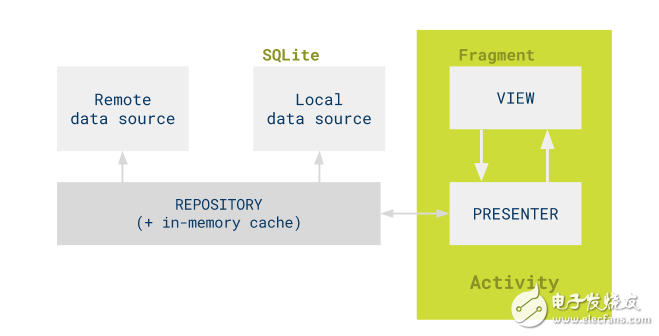
Mvp
Base class
Presenter base class:
Public interface BasePresenter {
Void start();
}
In the example, this start() method is called in the Fragment's onResume().
View base class:
Public interface BaseView "T" {
Void setPresenter(T presenter);
}
View implementation
As the implementation of each View interface, Fragment is mainly responsible for data display and call Presenter when user interaction, but there are some direct operation parts in the example code, such as clicking to open another Activity, click on the pop-up menu (the click of the menu item is still Call the presenter method).
The methods defined in the View interface are mostly showXXX() methods.
Fragment is implemented as a View, and methods are defined in the interface:
@Override
Public boolean isActive() {
Return isAdded();
}
In the data callback method in Presenter, first check whether View.isActive() is true to ensure the security of the Fragment operation.
Presenter implementation
Presenter's start() method is called when onResume(), and the initial data is taken at this time; other methods correspond to the user's interaction on the UI.
The operation of New Presenter is done in the onCreate() of each Activity: First add the Fragment(View), then pass it as a parameter to the Presenter. There is no reference to the Presenter.
Presenter's constructor takes two arguments, one is Model (the Model class is generally called XXXRepository), and the other is View. The construct uses guava's checkNotNull().
Check if the two parameters are null, then assign them to the field; then call View's setPresenter() method to pass the Presenter back to the View reference.
Model implementation details
Model has only one class, TasksRepository. It is also a singleton. Because in the example of this application, the data we operate is this one.
It is provided by the manually implemented injection class Injection class:
Public class Injection {
Public static TasksRepository provideTasksRepository(@NonNull Context context) {
checkNotNull(context);
Return TasksRepository.getInstance(FakeTasksRemoteDataSource.getInstance(),
TasksLocalDataSource.getInstance(context));
}
}
Constructed as follows:
Private TasksRepository(@NonNull TasksDataSource tasksRemoteDataSource,
@NonNull TasksDataSource tasksLocalDataSource) {
mTasksRemoteDataSource = checkNotNull(tasksRemoteDataSource);
mTasksLocalDataSource = checkNotNull(tasksLocalDataSource);
}
The data is divided into two parts: local and remote. The local part is responsible for the operation of the database, and the remote part is responsible for the network. There is also a memory cache in the Model class.
TasksDataSource is an interface. The callback interface of the Presenter query data is defined in the interface, and there are some methods for adding, deleting, and changing.
unit test
The main advantage of the MVP model is the ease of adding unit tests to the business logic.
The unit test in this example is added to the TasksRepository and the Presentation of the four features.
Uniter of Presenter, Mock has View and Model, test call logic, such as:
Public class AddEditTaskPresenterTest {
@Mock
Private TasksRepository mTasksRepository;
@Mock
Private AddEditTaskContract.View mAddEditTaskView;
Private AddEditTaskPresenter mAddEditTaskPresenter;
@Before
Public void setupMocksAndView() {
MockitoAnnotations.initMocks(this);
When(mAddEditTaskView.isActive()).thenReturn(true);
}
@Test
Public void saveNewTaskToRepository_showsSuccessMessageUi() {
mAddEditTaskPresenter = new AddEditTaskPresenter("1", mTasksRepository, mAddEditTaskView);
mAddEditTaskPresenter.saveTask("New Task Title", "Some Task Description");
Verify(mTasksRepository).saveTask(any(Task.class)); // saved to the model
Verify(mAddEditTaskView).showTasksList(); // shown in the UI
}
. . .
}
Todo-mvp-loaders MVP with data from Loader
Based on the previous example todo-mvp, except that instead of using Loader to get data from the Repository.
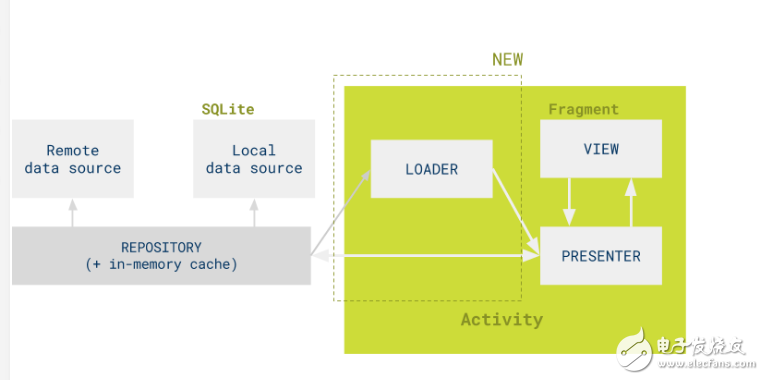
Todo-mvp-loaders
Advantages of using Loader:
Remove the callback and automatically implement asynchronous loading of data;
Call back new data when the content changes;
When the application rebuilds the loader due to a configuration change, it automatically reconnects to the previous loader.
Diff with todo-mvp
Since it is based on todo-mvp, the ones we said before will not be repeated. Let's see what changes have been made:
Git difftool -d todo-mvp
Added two classes:
TaskLoader and TasksLoader.
In the Activity new loader class, and then passed in the constructor of the Presenter.
The View interface in the Contract deletes the isActive() method, and the Presenter deletes the populateTask() method.
data collection
The two new classes added are TaskLoader and TasksLoader, both of which inherit from AsyncTaskLoader, except that the data type is singular and complex.
AsyncTaskLoader is based on ModernAsyncTask, similar to AsyncTask,
Put the load data operation in loadInBackground(), the deliverResult() method will return the result to the main thread, we can receive the returned data in the listener's onLoadFinished(), (in this case, a few a Presenter implements this interface).
These two methods of the TasksDataSource interface:
List "Task" getTasks();
Task getTask(@NonNull String taskId);
They all become synchronous methods because they are called in the loadInBackground() method.
Loader and LoaderManager are saved in Presenter, initLoader in start() method, and then onCreateLoader returns the constructor that is passed in.
OnLoadFinished() calls the method of View. At this point, Presenter implements LoaderManager.LoaderCallbacks.
Data change listener
The TasksRepository class defines the interface of the observer, which holds a list of listeners:
Private List "TasksRepositoryObserver" mObservers = new ArrayList "TasksRepositoryObserver" ();
Public interface TasksRepositoryObserver {
Void onTasksChanged();
}
Called every time there is a data change that needs to be refreshed:
Private void notifyContentObserver() {
For (TasksRepositoryObserver observer : mObservers) {
observer.onTasksChanged();
}
}
Register and unregister the listener for the TasksRepository in the two Loaders: add, onReset() in the onStartLoading() method.
So every time TasksRepository has data changes, both Loaders as listeners will be notified, then force load:
@Override
Public void onTasksChanged() {
If (isStarted()) {
forceLoad();
}
}
This way the onLoadFinished() method will be called.
Todo-databinding
Based on todo-mvp, use the Data Binding library to display data and bind UI and actions.
When it comes to ViewModel, there is another mode called MVVM (Model-View-ViewModel) mode.
This example does not strictly follow the Model-View-ViewModel pattern or the Model-View-Presenter pattern because it uses both a ViewModel and a Presenter.
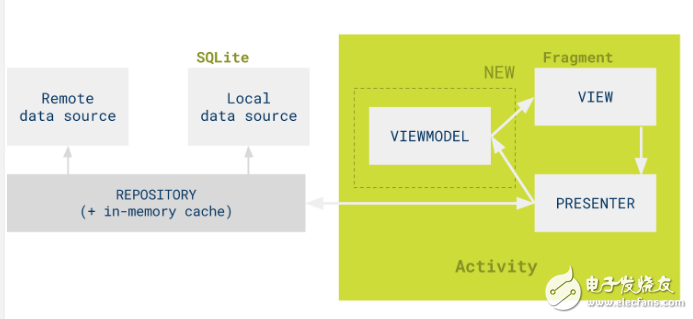
Mvp-databinding
The Data Binding Library binds UI elements to the data model:
The layout file is used to bind data and UI elements;
Event and action handler binding;
The data becomes observable and can be updated automatically when needed.
Diff with todo-mvp
Added several classes:
StatisticsViewModel;
SwipeRefreshLayoutDataBinding;
TasksItemActionHandler;
TasksViewModel;
It can be seen from several View interfaces that the number of methods is reduced. It turns out that multiple showXXX() methods are needed. Now only one or two methods are needed.
Data binding
Take TasksDetailFragment as an example:
Previously needed in todo-mvp:
Public void onCreateView(..) {
. . .
mDetailDescription = (TextView)
root.findViewById(R.id.task_detail_description);
}
@Override
Public void showDescription(String description) {
mDetailDescription.setVisibility(View.VISIBLE);
mDetailDescription.setText(description);
}
Now only need this:
Public View onCreateView(LayoutInflater inflater, ViewGroup container, Bundle savedInstanceState) {
View view = inflater.inflate(R.layout.taskdetail_frag, container, false);
mViewDataBinding = TaskdetailFragBinding.bind(view);
. . .
}
@Override
Public void showTask(Task task) {
mViewDataBinding.setTask(task);
}
Because all data binding operations are written in xml:
TextView
Android:id="@+id/task_detail_description"
. . .
Android:text=“@{task.description}†/》
Event binding
Data binding eliminates findViewById() and setText(), and event binding eliminates setOnClickListener().
Such as in taskdetail_frag.xml
CheckBox
Android:id="@+id/task_detail_complete"
. . .
Android:checked="@{task.completed}"
Android:onCheckedChanged="@{(cb, isChecked) -"
presenter.completeChanged(task, isChecked)}" /"
Where Presenter is introduced at this time:
@Override
Public void onActivityCreated(Bundle savedInstanceState) {
super.onActivityCreated(savedInstanceState);
mViewDataBinding.setPresenter(mPresenter);
}
Data monitoring
In the interface TasksFragment that displays the List data, you only need to know whether the data is empty, so it uses the TasksViewModel to provide information to the layout. When the size is set, only some related properties are notified, and the UI elements bound to these properties. Updated.
Public void setTaskListSize(int taskListSize) {
mTaskListSize = taskListSize;
notifyPropertyChanged(BR.noTaskIconRes);
notifyPropertyChanged(BR.noTasksLabel);
notifyPropertyChanged(BR.currentFilteringLabel);
notifyPropertyChanged(BR.notEmpty);
notifyPropertyChanged(BR.tasksAddViewVisible);
}
Other implementation details
Data Binding in Adapter, see TasksAdapter in TasksFragment.
@Override
Public View getView(int i, View view, ViewGroup viewGroup) {
Task task = getItem(i);
TaskItemBinding binding;
If (view == null) {
// Inflate
LayoutInflater inflater = LayoutInflater.from(viewGroup.getContext());
// Create the binding
Binding = TaskItemBinding.inflate(inflater, viewGroup, false);
} else {
Binding = DataBindingUtil.getBinding(view);
}
// We might be recycling the binding for another task, so update it.
// Create the action handler for the view
TasksItemActionHandler itemActionHandler =
New TasksItemActionHandler(mUserActionsListener);
binding.setActionHandler(itemActionHandler);
binding.setTask(task);
binding.executePendingBindings();
Return binding.getRoot();
}
Presenter may be wrapped in an ActionHandler, such as TasksItemActionHandler.
ViewModel can also be used as an implementation of the View interface, such as StatisticsViewModel.
The onRefresh() action binding defined by the SwipeRefreshLayoutDataBinding class.
Todo-mvp-clean
This example is based on the principles of Clean Architecture:
The Clean Architecture.
For Clean Architecture, you can also see this Sample App: Android-CleanArchitecture.
This example adds a layer of domain to the todo-mvp and divides the application into three layers:
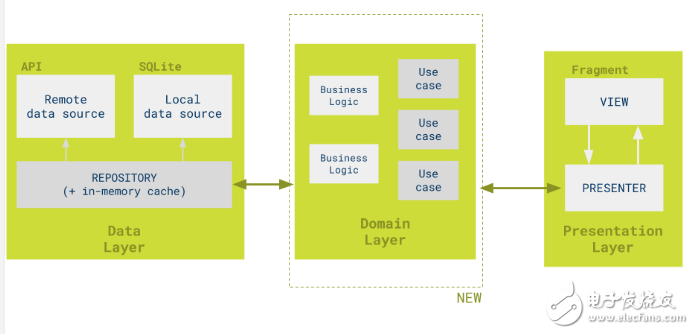
Mvp-clean.png
Domain: Contains business logic, the domain layer contains use cases or actors, used by the presenters of the application. These use cases represent all possible behaviors from the presentation layer.
Key concept
The biggest difference from the basic mvp sample is the domain layer and use cases. The domain layer extracted from the presenters helps to avoid code duplication in the presenter.
Use cases define the operations required by the app, which increases the readability of the code because the class name reflects the purpose.
Use cases are also good for multiplexing of operations. For example, the CompleteTask is used in both Presenters.
The use cases are executed in the background thread, using the command pattern. This domain layer is completely decoupled for the Android SDK and other third-party libraries.
Diff with todo-mvp
A domain layer has been added to each feature package, which contains subdirectories model and usecase.
UseCase is an abstract class that defines the underlying interface points of the domain layer.
UseCaseHandler is used to execute use cases, which is a singleton that implements the command pattern.
UseCaseThreadPoolScheduler implements the UseCaseScheduler interface, defines the thread pool for use cases to execute, performs asynchronous execution in the background thread, and finally returns the result to the main thread.
UseCaseScheduler is passed to the UseCaseHandler via the constructor.
Another implementation of UseCaseScheduler was used in the test, TestUseCaseScheduler, and all executions became synchronized.
The Injection class provides dependency injection for multiple Use cases, and the UseCaseHandler is used to execute use cases.
In the implementation of Presenter, multiple use cases and UsseCaseHandler are passed in by the constructor, performing actions such as updating a task:
Private void updateTask(String title, String description) {
If (mTaskId == null) {
Throw new RuntimeException("updateTask() was called but task is new.");
}
Task newTask = new Task(title, description, mTaskId);
mUseCaseHandler.execute(mSaveTask, new SaveTask.RequestValues(newTask),
New UseCase.UseCaseCallback"SaveTask.ResponseValue"() {
@Override
Public void onSuccess(SaveTask.ResponseValue response) {
// After an edit, go back to the list.
mAddTaskView.showTasksList();
}
@Override
Public void onError() {
showSaveError();
}
});
}
Todo-mvp-dagger
Key concepts:
Dagger2 is a static compile-time dependency injection framework.
In this example, dagger2 is used instead to implement dependency injection. The main benefit of this is that we can use alternative modules when testing. This can be done with flavors during compilation, or by using some debug panels during runtime.
Diff with todo-mvp
The Injection class has been removed.
Added 5 components, one for each of the four features, and the other data corresponds to one: TasksRepositoryComponent, this Component is saved in the Application.
The module of the data: TasksRepositoryModule has one in each of the mock and prod directories.
The injection of the Presenter for each feature is implemented like this:
First, mark the Presenter's constructor as @Inject, then construct the component in the Activity and inject it into the field:
@Inject AddEditTaskPresenter mAddEditTasksPresenter;
@Override
Protected void onCreate(Bundle savedInstanceState) {
super.onCreate(savedInstanceState);
setContentView(R.layout.addtask_act);
. . . . .
// Create the presenter
DaggerAddEditTaskComponent.builder()
.addEditTaskPresenterModule(
New AddEditTaskPresenterModule(addEditTaskFragment, taskId))
.tasksRepositoryComponent(
((ToDoApplication) getApplication()).getTasksRepositoryComponent()).build()
.inject(this);
}
The module and taskId are provided in this module:
@Module
Public class AddEditTaskPresenterModule {
Private final AddEditTaskContract.View mView;
Private String mTaskId;
Public AddEditTaskPresenterModule(AddEditTaskContract.View view, @Nullable String taskId) {
mView = view;
mTaskId = taskId;
}
@Provides
AddEditTaskContract.View provideAddEditTaskContractView() {
Return mView;
}
@Provides
@Nullable
String provideTaskId() {
Return mTaskId;
}
}
Note that the setPresenter method called in the original constructor is instead implemented with a method injection:
/**
* Method injection is used here to safely reference {@code this} after the object is created.
* For more information, see Java Concurrency in Practice.
*/
@Inject
Void setupListeners() {
mAddTaskView.setPresenter(this);
}
Todo-mvp-contentproviders
This example is based on todo-mvp-loaders, which uses the content provider to get the data in the repository.
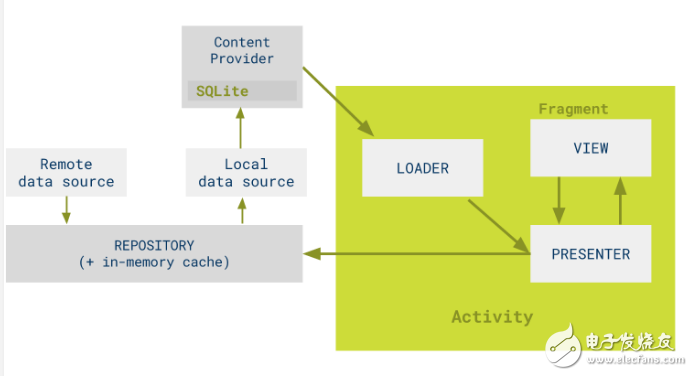
Mvp-contentproviders
The advantages of using Content Provider are:
Manage access to structured data;
The Content Provider is a standard interface for accessing data across processes.
Diff with todo-mvp-loaders
Note that this example is the only one based on the most basic todo-mvp, but based on todo-mvp-loaders. (But I think it can be thought of as converting directly from todo-mvp.)
Look at diff: git difftool -d todo-mvp-loaders.
Removed TaskLoader and TasksLoader. (returned to the basic todo-mvp).
The methods in TasksRepository are not synchronous methods, but asynchronous plus callbacks. (Return to the basic todo-mvp).
The read methods in TasksLocalDataSource have become empty implementations, because Presenter can now automatically receive data updates.
There are two ways to add a LoaderProvider to create a Cursor Loader:
// return data under or all of a particular fiter
Public Loader "Cursor" createFilteredTasksLoader(TaskFilter taskFilter)
// return data for a specific id
Public Loader "Cursor" createTaskLoader (String taskId)
The parameter TaskFilter of the first method is used to specify the filtering selection condition, which is also a new class.
Both LoaderManager and LoaderProvider are constructed by passing in the Presenter, in the callback onTaskLoaded() and onTasksLoaded() in the init loader.
In the TasksPresenter, I also made a judgment, whether it is an init loader or a restart loader:
@Override
Public void onTasksLoaded(List "Task" tasks) {
// we don't care about the result since the CursorLoader will load the data for us
If (mLoaderManager.getLoader(TASKS_LOADER) == null) {
mLoaderManager.initLoader(TASKS_LOADER, mCurrentFiltering.getFilterExtras(), this);
} else {
mLoaderManager.restartLoader(TASKS_LOADER, mCurrentFiltering.getFilterExtras(), this);
}
}
The second parameter passed in when initLoader() and restartLoader() is a bundle, which is used to indicate the filter type, that is, the database query with the selection condition.
Also do View processing on onLoadFinshed(), taking TaskDetailPresenter as an example:
@Override
Public void onLoadFinished(Loader "Cursor" loader, Cursor data) {
If (data != null) {
If (data.moveToLast()) {
onDataLoaded(data);
} else {
onDataEmpty();
}
} else {
onDataNotAvailable();
}
}
The static method in the data class Task has been changed from Cursor to Task. This method is used in Presenter's onLoadFinished() and test.
Public static Task from(Cursor cursor) {
String entryId = cursor.getString(cursor.getColumnIndexOrThrow(
TasksPersistenceContract.TaskEntry.COLUMN_NAME_ENTRY_ID));
String title = cursor.getString(cursor.getColumnIndexOrThrow(
TasksPersistenceContract.TaskEntry.COLUMN_NAME_TITLE));
String description = cursor.getString(cursor.getColumnIndexOrThrow(
TasksPersistenceContract.TaskEntry.COLUMN_NAME_DESCRIPTION));
Boolean completed = cursor.getInt(cursor.getColumnIndexOrThrow(
TasksPersistenceContract.TaskEntry.COLUMN_NAME_COMPLETED)) == 1;
Return new Task(title, description, entryId, completed);
}
Some other details:
The memory cache in the database has been deleted.
The Adapter is inherited from the CursorAdapter.
unit test
A new MockCursorProvider class has been added to provide data in unit tests.
Its internal class TaskMockCursor mocks the Cursor data.
Presenter's test still mocks all the parameters passed in the construct, and then prepares the mock data. The logic of the test is mainly the view operation after getting the data, for example:
@Test
Public void loadAllTasksFromRepositoryAndLoadIntoView() {
// When the loader finishes with tasks and filter is set to all
When(mBundle.getSerializable(TaskFilter.KEY_TASK_FILTER)).thenReturn(TasksFilterType.ALL_TASKS);
TaskFilter taskFilter = new TaskFilter(mBundle);
mTasksPresenter.setFiltering(taskFilter);
mTasksPresenter.onLoadFinished(mock(Loader.class), mAllTasksCursor);
// Then progress indicator is hidden and all tasks are shown in UI
Verify(mTasksView).setLoadingIndicator(false);
Verify(mTasksView).showTasks(mShowTasksArgumentCaptor.capture());
}
Todo-mvp-rxjava
For this example, I have read the author's article before: Android Architecture Patterns Part 2:
Model-View-Presenter,
This article has been on Android Weekly Issue #226.
This example is also based on todo-mvp, which uses RxJava to handle communication between the presenter and the data layer.
MVP basic interface change
The BasePresenter interface is changed to:
Public interface BasePresenter {
Void subscribe();
Void unsubscribe();
}
View calls Presenter's subscribe() on onResume(); calls the presenter's unsubscribe() on onPause().
If the implementation of the View interface is not a Fragment or Activity, but a custom View of Android, then these two methods are called in the onAttachedToWindow() and onDetachedFromWindow() methods of the Android View.
Saved in Presenter:
Private CompositeSubscription mSubscriptions;
In the case of subscribe(), mSubscriptions.add(subscription);;
In the case of unsubscribe(), mSubscriptions.clear();
Diff with todo-mvp
The data layer exposes RxJava's Observable stream as a way to get the data. The methods in the TasksDataSource interface become like this:
Observable "List "Task" getTasks();
Observable "Task" getTask(@NonNull String taskId);
The callback interface has been removed because it is not needed.
The implementation in TasksLocalDataSource uses SqlBrite, and the result of querying from the database is easily changed into a stream:
@Override
Public Observable "List "Task" getTasks() {
. . .
Return mDatabaseHelper.createQuery(TaskEntry.TABLE_NAME, sql)
.mapToList(mTaskMapperFunction);
}
The TasksRepository integrates the local and remote data, and finally returns the Observable to the consumer (Presenters and Unit Tests). The .concat() and .first() operators are used here.
Presenter subscribes to the Observable of the TasksRepository, then determines the operation of the View, and the Presenter is also responsible for the scheduling of the thread.
Simple such as AddEditTaskPresenter:
@Override
Public void populateTask() {
If (mTaskId == null) {
Throw new RuntimeException("populateTask() was called but task is new.");
}
Subscription subscription = mTasksRepository
.getTask(mTaskId)
.subscribeOn(mSchedulerProvider.computation())
.observeOn(mSchedulerProvider.ui())
.subscribe(new Observer《Task》() {
@Override
Public void onCompleted() {
}
@Override
Public void onError(Throwable e) {
If (mAddTaskView.isActive()) {
mAddTaskView.showEmptyTaskError();
}
}
@Override
Public void onNext(Task task) {
If (mAddTaskView.isActive()) {
mAddTaskView.setTitle(task.getTitle());
mAddTaskView.setDescription(task.getDescription());
}
}
});
mSubscriptions.add(subscription);
}
The StatisticsPresenter is responsible for displaying the statistics. The TasksPresenter is responsible for filtering and displaying all the data. The RxJava operator is used more and can see the characteristics of the chain operation.
Regarding thread scheduling, the BaseSchedulerProvider interface is defined, passed to the Presenter through the constructor, and then implemented with the SchedulerProvider, which is tested with the ImmediateSchedulerProvider. This is convenient for testing.
Bitmain Miner:Bitmain Antminer L7 (9.5Gh),Bitmain Antminer L7 (9.16Gh),Bitmain Antminer L7 (9.05Gh),Bitmain Antminer L3+ (504Mh),Bitmain Antminer L3+ (600Mh),Bitmain Antminer L3++ (580Mh),Bitmain Antminer L3++ (596Mh)
Bitmain is the world's leading digital currency mining machine manufacturer. Its brand ANTMINER has maintained a long-term technological and market dominance in the industry, with customers covering more than 100 countries and regions. The company has subsidiaries in China, the United States, Singapore, Malaysia, Kazakhstan and other places.
Bitmain has a unique computing power efficiency ratio technology to provide the global blockchain network with outstanding computing power infrastructure and solutions. Since its establishment in 2013, ANTMINER BTC mining machine single computing power has increased by three orders of magnitude, while computing power efficiency ratio has decreased by two orders of magnitude. Bitmain's vision is to make the digital world a better place for mankind.
Bitmain Miner,antminer L3 Miner,Asic L3 Antminer,Bitmain Antminer L7,ltc miner
Shenzhen YLHM Technology Co., Ltd. , https://www.asicminer-ylhm.com